Are you tired of seeing the same old irrelevant Wi-Fi networks on your Mac, or trying to connect to an old network only to find that it doesn’t work anymore? Fret not! In this article, we will help you get rid of old Wi-Fi networks saved on your Mac, so you can stay trouble-free. With that said, let’s dive into the best ways to forget a network on Mac, without any technical jargon.
Understanding the Concept of Forgetting a Network
When you connect to a Wi-Fi network for the first time, your Mac saves its details for future reference. However, this process of network saving can create problems when you switch to another network with the same name or when the original network ceases to exist or becomes unstable. In such cases, forgetting the network is the best way to get rid of the unusable network on your Mac.
Forgetting a network means erasing its credentials from your Mac so that it can no longer connect to it automatically. It also means that your Mac will stop displaying it in the list of available Wi-Fi networks.
Steps to Forget Network on Mac
Here are three simple ways to forget network on Mac:
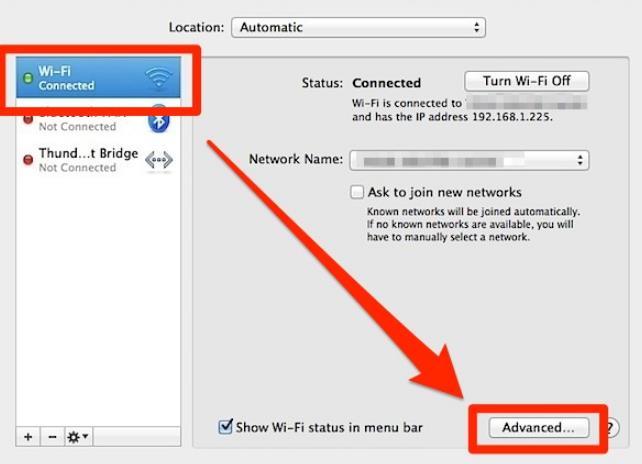
Method 1: Using System Preferences
- Click on the Apple menu in the upper left corner of your screen and select “System Preferences.”
- Click on “Network” and select the Wi-Fi network you want to forget.
- Click on “Advanced” and select the “Wi-Fi” tab.
- Highlight the network you want to forget and click on the “-” button below the list of preferred networks.
- Finally, click on “OK” to save the changes.
How to Forget Network on Mac: Say Goodbye to Network Hassles
Method 2: Using the Wi-Fi Icon
- Click on the Wi-Fi icon in the menu bar.
- Scroll down to the preferred network and click on it.
- Click on “Remove Network” to forget the network.
Method 3: Using Terminal
- Open the Terminal application by pressing “Command + Space” and typing “Terminal” in the search box.
- Type the following command in the Terminal window: networksetup -removepreferredwirelessnetwork “SSID”
- (Note: Replace “SSID” with your Wi-Fi network name)
- Hit “Enter” and enter your admin password if prompted.
Additional Tips to Manage Wi-Fi Networks on Mac
- Use the “Open Wi-Fi Diagnostics” option from the Wi-Fi menu to troubleshoot connectivity issues.
- Use the “Create Diagnostic Report” option to generate a report that can help identify and fix Wi-Fi problems.
- Keep the “Connect Automatically” box unchecked for all public Wi-Fi networks.
- Remove Wi-Fi networks that are no longer needed or are unstable.
- Use a VPN to protect your Mac when you connect to public Wi-Fi networks.
Benefits of Forgetting a Network on Mac
- Improves the speed and reliability of your Wi-Fi connections.
- Prevents your Mac from connecting to unstable or unsafe networks.
- Reduces the number of irrelevant Wi-Fi networks displayed on your Mac.
- Saves battery life by preventing your Mac from constantly searching for networks.
Conclusion
To make the most out of your Wi-Fi connectivity, it’s essential to manage your Wi-Fi networks efficiently. Forgetting a network on Mac is an easy process that doesn’t require any technical expertise. By applying the methods mentioned in this article, you can remove unwanted networks from your Mac and enjoy seamless Wi-Fi connectivity. Don’t forget to follow the tips mentioned above to optimize your Wi-Fi connection and stay secure when you connect to public Wi-Fi.
FAQs
[faq-schema id=”230″]